Printing – HP Printer not Printing Color or Not Printing Black
APPLIES TO:
HP DeskJet 2755 All-in-One Printer,
HP DeskJet 2755e All-in-One Printer,
HP DeskJet 3755 All-in-One Printer,
HP DeskJet 4155e All-in-One Printer,
HP DesignJet Studio Wood Large Format Wireless Plotter Printer - 36", with High-Tech Wood Design (5HB14A),
HP DesignJet T230 Large Format Compact Wireless Plotter Printer - 24", with Mobile Printing (5HB07A),
HP DesignJet T650 Large Format Wireless Plotter Printer - 24", with convenient 1-Click Printing (5HB08A),
HP DesignJet T650 Large Format Wireless Plotter Printer - 36", with convenient 1-Click Printing (5HB10A),
HP DesignJet T730 Large Format Wireless Plotter Printer - 36", with Security Features (F9A29D),
HP DesignJet Z6dr Large Format Dual-Roll PostScript® Graphics Printer - 44", with Vertical Trimmer (T8W18A),
HP DesignJet Z9+ Large Format PostScript® Photo Printer - 24", with Spectrophotometer (W3Z71A),
HP DesignJet Z9+ Large Format PostScript® Photo Printer - 44", with Spectrophotometer (W3Z72A),
HP DesignJet Z9+dr Large Format Dual-Roll PostScript® Photo Printer - 44", with Vertical Trimmer (X9D24A),
HP ENVY Pro 6475 All-In-One Printer,
HP ENVY Photo 7155 All-in-One Printer,
HP ENVY Photo 7855 All-in-One Printer,
HP OfficeJet 200 Mobile Printer,
HP OfficeJet 250 Mobile All-in-One Printer,
HP OfficeJet Pro 6230 ePrinter,
HP OfficeJet Pro 9015e All-in-One Printer,
HP Smart Tank Plus 551 Wireless All-in-One,
HP Tango X with Indigo Linen Cover,
HP Tango X with Charcoal Linen Cover,
Note: This list may not be complete since new printers are constantly being developed and released that is compatible with Hewlett Packard Instant Ink
SYMPTOMS: After replacing the ink cartridge in Hewlett Packard ink printer, the printer will no longer print color printing or black.
RESOLUTION: Instant Ink does not work with general ink cartridges that are not Instant Ink.
If you are using Instant Ink and replace either the black or color cartridge with an original HP ink cartridge or an off-brand ink cartridge the Instant Ink cartridges will no longer print.
You will need to either replace your used Instant Ink cartridge with a new Instant Ink replacement cartridge so all your cartridges are Instant Ink or replace all ink cartridges with original ink cartridges.
Instant Ink will only print when used with other Instant Ink cartridges.
MORE INFORMATION: The conversion may fail on password protected files properties
PROPERTIES: Last modified: 4/20/21 Revision: 1.0
Keywords: HP Injet, HP Officejet, HP Deskjet, HP Designjet, HP Envy, HP Tango, HP Smart tank
NOTICE: If you found this article of value, please help us help underprivileged individuals to have hardware and software support at reasonable prices by donating below.
Mobile Mobile was started with the underprivileged in mind. People such as retired or elderly, young adults, single parents, and others are taken advantage of every day when trying to navigate and get help this world of technology. At Mobile Mobile we take the time to fix and also teach individuals one on one with phone and computer challenges that people face daily.
Windows: How to Enable GodMode aka “Windows Master Control Panel”
APPLIES TO: Windows 7, Windows 8, Windows 10, Windows 11
FEATURE: Enable “God Mode” also known as “Windows Master Control Panel
SOLUTION:
1. Create a New Folder on the Desktop by right clicking anywhere on the Desktop that does not have an icon.
2. In the dropdown menu left click on New then left click on Folder.
3. A folder icon will be created on the Desktop with the name New Folder. Note: If you click away from the folder it will remain with the name New Folder, right click the “New Folder” and select Rename from the dropdown menu.
4. Type in the name of the new folder exactly as follows:
GodMode.{ED7BA470-8E54-465E-825C-99712043E01C}
Press Enter to confirm the name.
The folder Icon will change to a Control Panel Icon with no name.
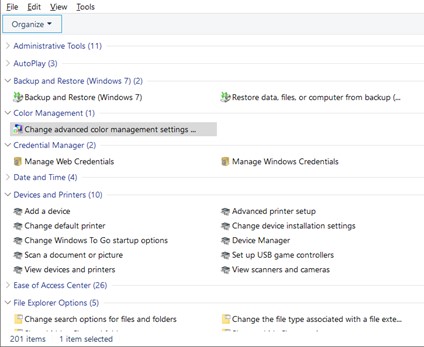
When opening the God Mode Control Panel you will see a list of all of options available through this feature. Below is a screen shot showing just a portion of the 201 shortcuts to tools and features in Windows.
ADDITIONAL INFORMATION: the ability to collapse and expand the categories makes this large list of shortcuts more manageable. Simply right click a category and expand all or collapse all or in the individual categories click on the > to expand or collapse.
This feature is not an actual mode and does not provide and advanced functionality to Windows. It is just a method of organizing Windows settings into one convenient location.
PROPERTIES: Last modified: 5/6/22 Revision: 1.01
Keywords: Godmode, God Mode, Windows Master Control Panel, Windows 7, Windows 8, Windows 10, Windows 11
Win10: Win7: Laptop Speaker Crackles/Static When Playing Audio
|
APPLIES TO: Microsoft Windows All Versions. Any laptop model using Realtek driver with built-in speakers. |
| SYMPTOMS: When playing audio through a video or listening to music, the built-in speakers emit crackling or static noise. Additionally, the audio sound is not consistent and may lower or raise in volume for no reason. |
|
RESOLUTION:
If the problem continues then test further using external speakers. If you still have the problem with external speakers then attempt the resolution above one more time. Then if you still have the problem search for an updated driver for your audio device. If the problem does not occur with external speakers then there may be a problem with the speaker hardware. |
| PROPERTIES: Last modified: 06/12/20 Revision: 1.1 |
| Keywords: speaker crackle, speaker static, Windows, Microsoft Windows 10 |
NOTICE: If you found this article of value, please help us help underprivileged individuals to have hardware and software support at reasonable prices by donating below.
Mobile Mobile was started with the underprivileged in mind. People such as retired or elderly, young adults, single parents, and others are taken advantage of every day when trying to navigate and get help this world of technology. At Mobile Mobile we take the time to fix and also teach individuals one on one with phone and computer challenges that people face daily.
MSOFF001 – How to Bulk Convert Microsoft Office 2003 files to New Office Format
| APPLIES TO: Microsoft Office versions: 2003, 2007, 2010, 1013 and up | ||||||||||||
|
SYMPTOMS: As of the release of Office 2007, Microsoft Office file formats have changed. This format change was a compression algorithm that allows the original data to be perfectly reconstructed from the compressed data. This compression reduces the size of files that will allow them to travel through email. To accommodate the Microsoft Office community with conversion, Microsoft has provided for bulk conversion. The following table contains the Microsoft Office file extension changes that occurred as of Microsoft Office 2007.
|
||||||||||||
|
RESOLUTION: The following steps can be used to convert Microsoft Office files in bulk to the new compression format.
|
||||||||||||
| MORE INFORMATION: The conversion may fail on password protected files | ||||||||||||
| PROPERTIES: Last modified: 6/8/17 Revision: 1.0 |
||||||||||||
| Keywords: office 2003 bulk conversion, office 2007 bulk conversion |
NOTICE: If you found this article of value, please help us help underprivileged individuals to have hardware and software support at reasonable prices by donating below.
Mobile Mobile was started with the underprivileged in mind. People such as retired or elderly, young adults, single parents, and others are taken advantage of every day when trying to navigate and get help this world of technology. At Mobile Mobile we take the time to fix and also teach individuals one on one with phone and computer challenges that people face daily.
Resolution Error message: “The operating system is not adequate for running Lightscribe Template Labeler”
| APPLIES TO: Microsoft Windows 7, Microsoft Windows 8.1, Microsoft Windows 10 |
|
SYMPTOMS: Installation fails when running setup executable for Lightscribe Template Labeler with the error message, "The operating system is not adequate for running Lightscribe Template Labeler" |
|
RESOLUTION: 1. Run the installer. (It doesn't matter what compatibility mode its in) 2. When you receive the error message "the operating system is not adequate for running lightscribe template labeler", do not click on OK and acknowledge the error message, leave that window open. 3. Enter the following command in the Run command for your version of Windows, "%LOCALAPPDATA%\Temp" (without quotes).
In Windows 8.1: In Windows 7 add the Run command to the Start menu: 4. Sort the folders by Date Modified by left mouse clicking on the column heading Date Modified until the most recent date is at the top. Scroll down and look for a folder (note: this is not a file but a folder) that was just created that has a guid as its name. On my system the folder is named: {6E99E2A8-A64C-4DF7-981D-F8D7AE994473}. Your folder name will likely be different but the format of the name will be similar. 5. Right click the folder and open it using Notepad. Once in the folder scroll down and look for the file "LightScribe Template Labeler.msi" (without quotes) in the list of files. 6. Once you have confirmed the file is contained in the guid folder, copy this folder to your desktop and then you can click ok on the error message from the installer. 7. Download lessmsi. (This is a free utility called Less MSIerables that allows you to see the inards of msi files and extract their contents.) 8. Right click the Desktop and select New>Folder. Name the folder "Extracted Lessmsi". Copy the downloaded file lessmsi to this folder and then double click the file to run it. 9. If you closed the Notepad view of the guid file reopen the file using Notepad. Then drag and drop the LightScribe Template Labeler.msi file into Less MSIerables. 10. Click the "Select All" button at the bottom and then Extract. 11. Choose a new folder to extract the files to and click ok. Once extracted close Less MSIerables. 12. Go to the folder you extracted the files to then drill into SourceDir/program files/. 13. Copy the LightScribe Template Labeler directory and paste this folder into C:\Program Files (x86). Click ok on any confirmations windows may give you. 14. Now go back to the folder you extracted the files to from step 11 again but this time drill into SourceDir/Windows/system32/. Copy the three files you find there (msvcm80.dll, msvcp80.dll, msvcr80.dll) 15. Now navigate to: C:\Program Files (x86)\LightScribe Template Labeler and paste those three files there. 16. Now create a shortcut on your desktop to C:\Program Files (x86)\LightScribe Template Labeler\TemplateLabeler.exe and run it. |
| MORE INFORMATION: The above information was found on the Microsoft forums pages for the error message. I have used these instructions twice to install the utility. I decided that I needed to keep a copy for my own use. |
|
PROPERTIES: Last modified: 6/13/17 Revision: 1.0 |
| Keywords: Lightscribe Template Labeler Installation. Lightscribe error message. |
NOTICE: If you found this article of value, please help us help underprivileged individuals to have hardware and software support at reasonable prices by donating below.
Mobile Mobile was started with the underprivileged in mind. People such as retired or elderly, young adults, single parents, and others are taken advantage of every day when trying to navigate and get help this world of technology. At Mobile Mobile we take the time to fix and also teach individuals one on one with phone and computer challenges that people face daily.
Win10: How To Run The System File Checker (SFC) Windows 10
|
APPLIES TO: Windows 10 |
|
HOW TO: If Windows is not functioning properly or crashes the System File Checker can be used to fix file corruption of the Windows Operating System |
|
RESOLUTION: Step 1: Open an elevated command prompt. To do this, right click Start, and select Search in the Search dialog box type in Command Prompt or cmd. In the resulting box, right-click Command Prompt, and then click Run as administrator. If you are prompted for an administrator password or for a confirmation, type the password, or click Allow. Step 2: At the command prompt, type the following command, and then press ENTER: sfc /scannow (Note: the space after sfc) The sfc /scannow command will scan all protected system files, and replace corrupted files with a cached copy. Once the System Filer Check has completed your message may be: If this is your message run the System File Checker again until you get the following message: If you get the message: Then open the command prompt and run the following command. DISM.exe /Online /Cleanup-image /Restorehealth |
|
MORE INFORMATION: See Microsoft Knowledge Base Article at the following address: https://support.microsoft.com/en-us/help/929833/use-the-system-file-checker-tool-to-repair-missing-or-corrupted-system |
| PROPERTIES: Last modified: 7/15/19 Revision: 1.0 |
| Keywords: SFC, System File Checker, Windows 10 |
NOTICE: If you found this article of value, please help us help underprivileged individuals to have hardware and software support at reasonable prices by donating below.
Mobile Mobile was started with the underprivileged in mind. People such as retired or elderly, young adults, single parents, and others are taken advantage of every day when trying to navigate and get help this world of technology. At Mobile Mobile we take the time to fix and also teach individuals one on one with phone and computer challenges that people face daily.
WIN10: USB Ports Not Working In Windows 10
|
APPLIES TO: Windows 10 |
|
SYMPTOMS: USB ports not working in Windows 10 |
|
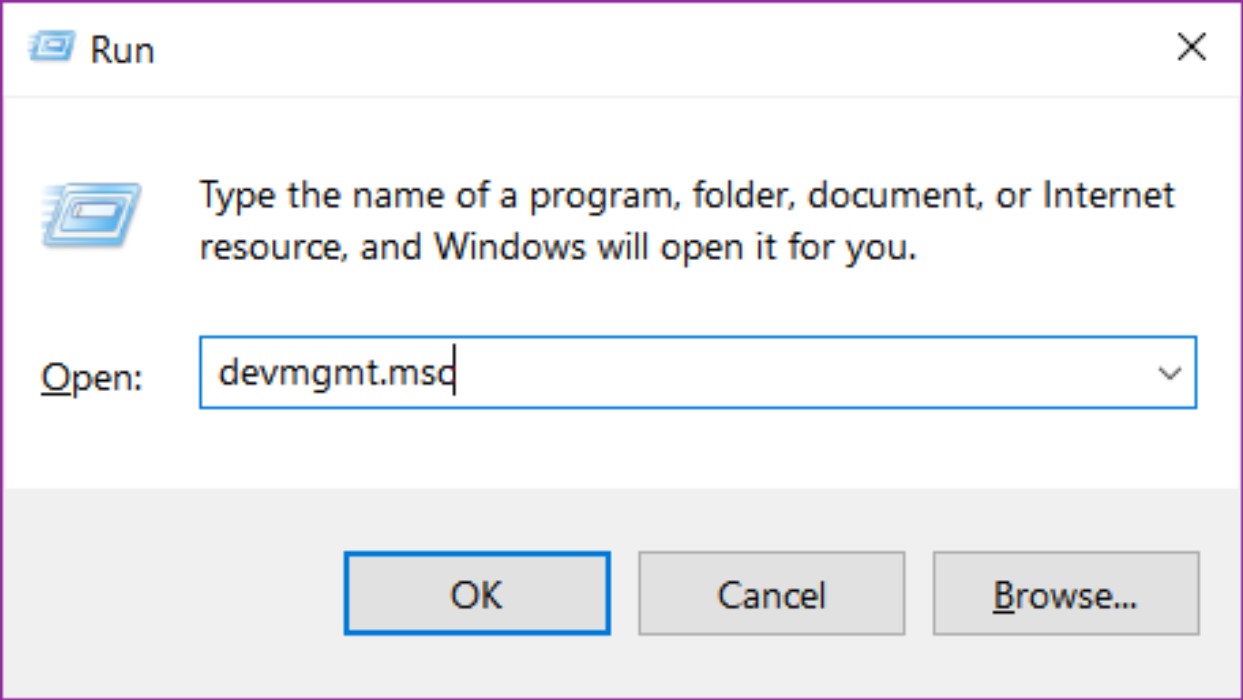
RESOLUTION: METHOD 1: Step 1: Test all USB ports on the computer and test ports with other devices. If you attempting to use a thumb drive try another thumb drive or try a usb mouse in the port. This will narrow down if the problem is isolated to a single port or all ports and if there is a problem with the usb device. Step 2: Open Device Manager by right clicking on the Windows startup icon and then selecting Device Manager. You can also press Windows Key + R to launch the Run dialogue box.
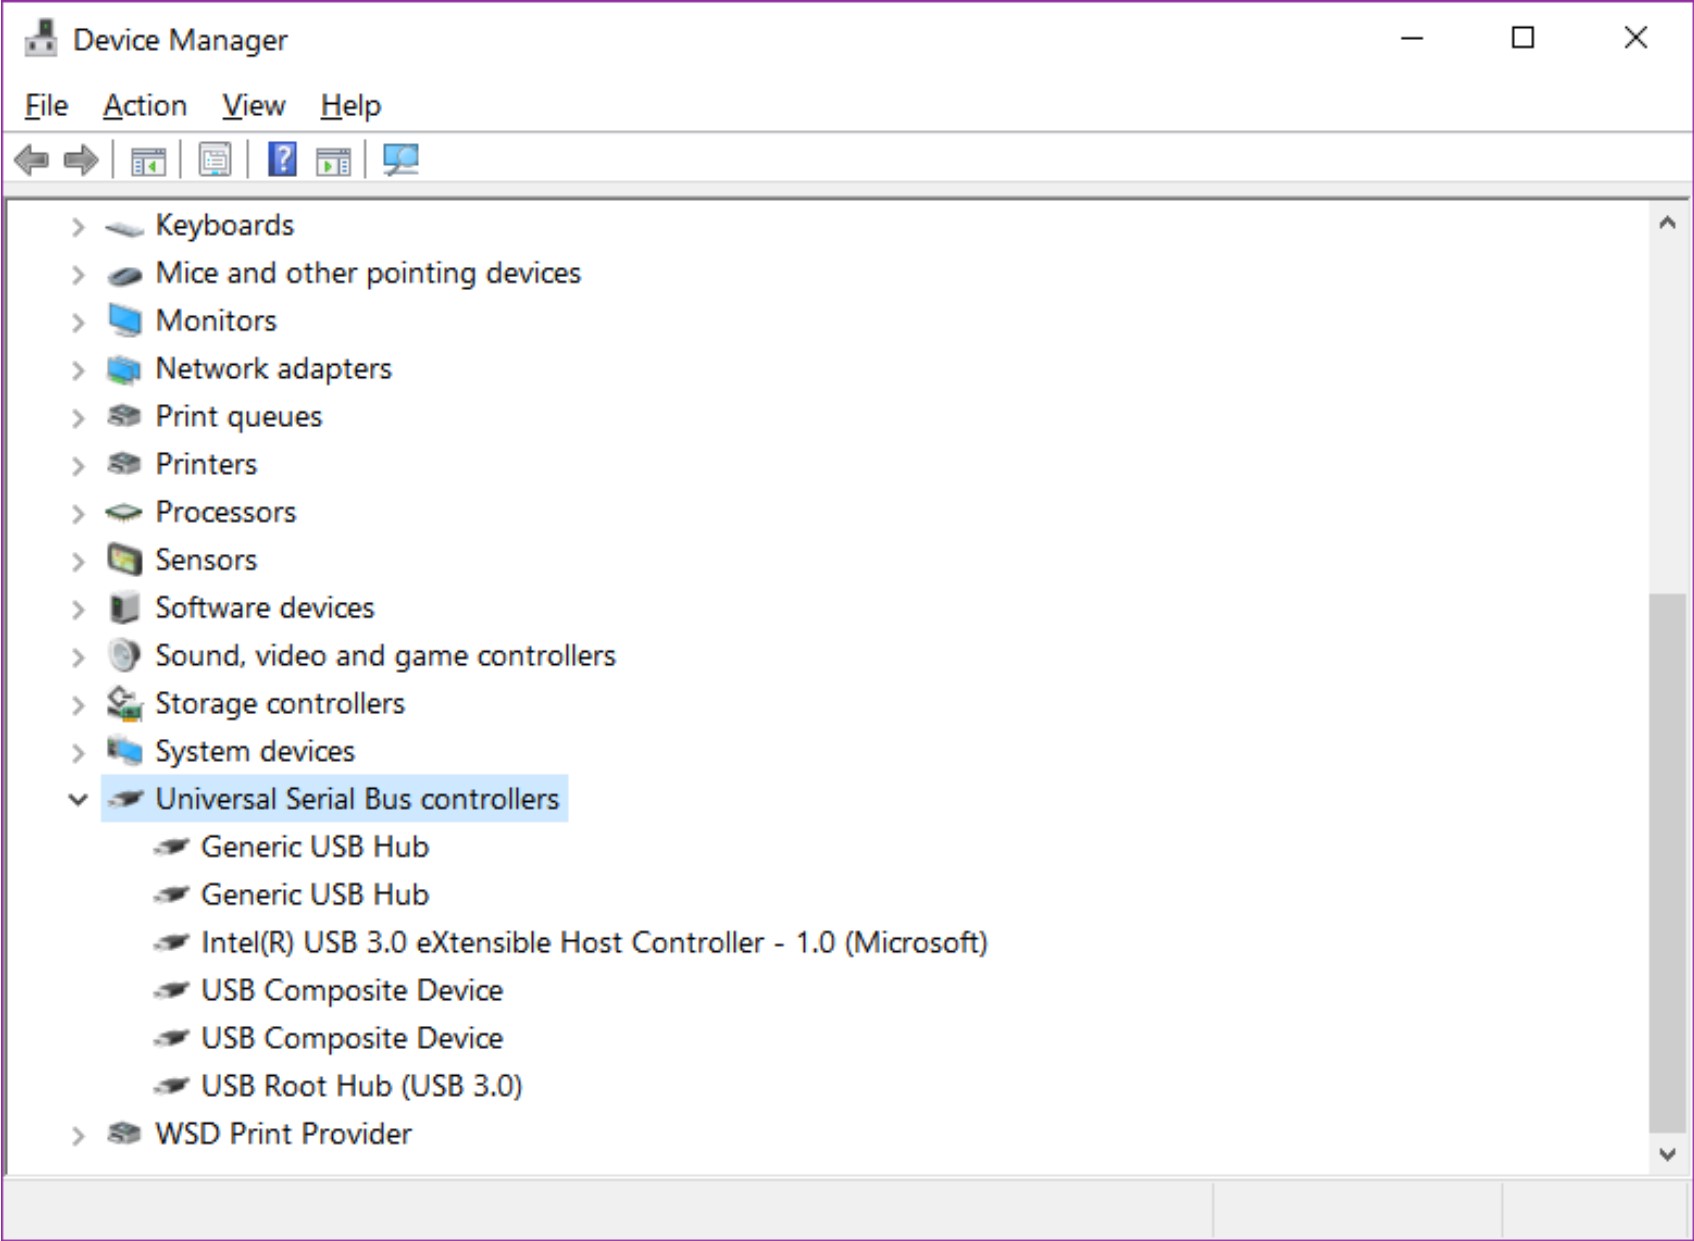
Type in devmgmt.msc and click OK. Step 3: In Device Manager dialog box locate Universal Serial Bus Controllers and expand. Make note of what is listed. If you have multiple USB ports on your system you should have multiple Generic USB Hub devices. It should look similar to the following image but it may not be exact. (Image is for example purposes only).
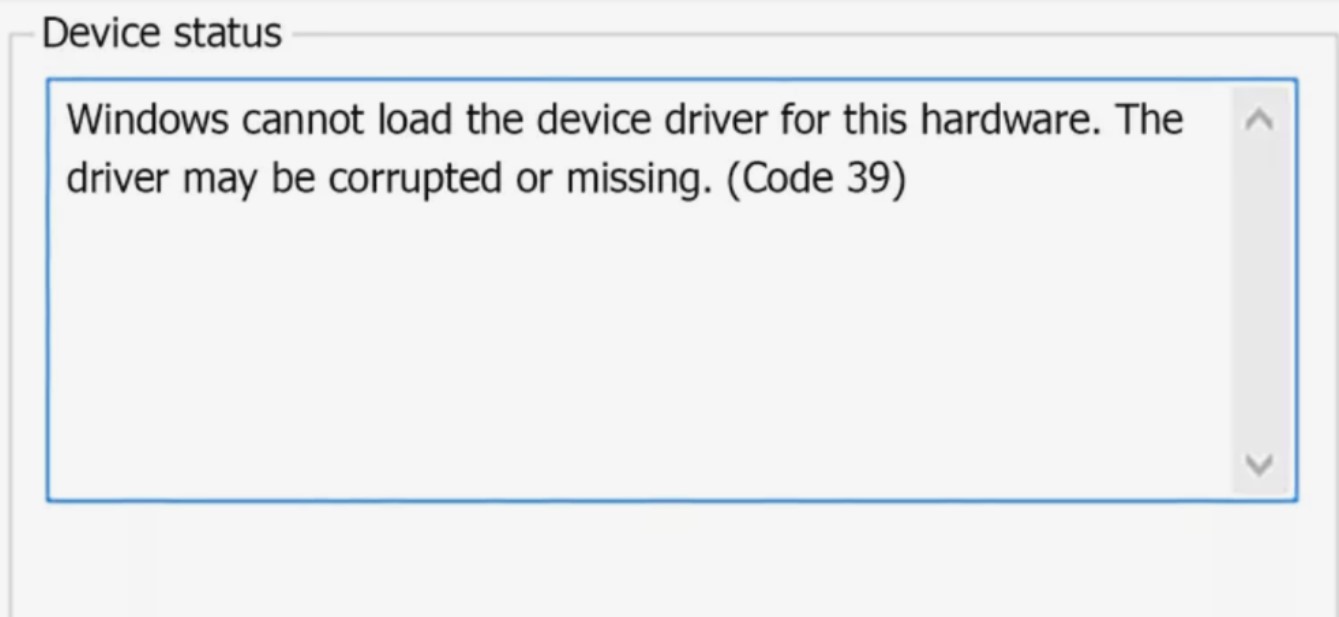
Step 4: With the Device Manager open and the Universal Serial Controllers expanded you want to visually look and see if you see any of the Generic USB devices with a warning on them like this. Step 5: Right click on one of the Generic USB's with the warning and select Update driver. In the Update drivers dialog box select Browse my computer for driver software, then click on Let me pick from list of available drivers on my computer. Step 6: In the compatible devices list select Generic USB Hub, click Next. You should get a dialog box stating, Windows has successfully updated your drivers. If you did not get the dialog that Windows successfully update the driver proceed to Method 2. Step 7: Close all the dialog boxes and reboot the computer and test the USB ports for connectivity. If the ports work then repeat Steps 1 through 6 for each USB device that displayed a warning in the Device Manager. If the USB ports are not working proceed to Step 8. NOTE: If you get a warning dialog stating the the driver is corrupted proceed to Method 4. METHOD 2: Step 1: If Windows failed to update properly you may have gotten a message like this:
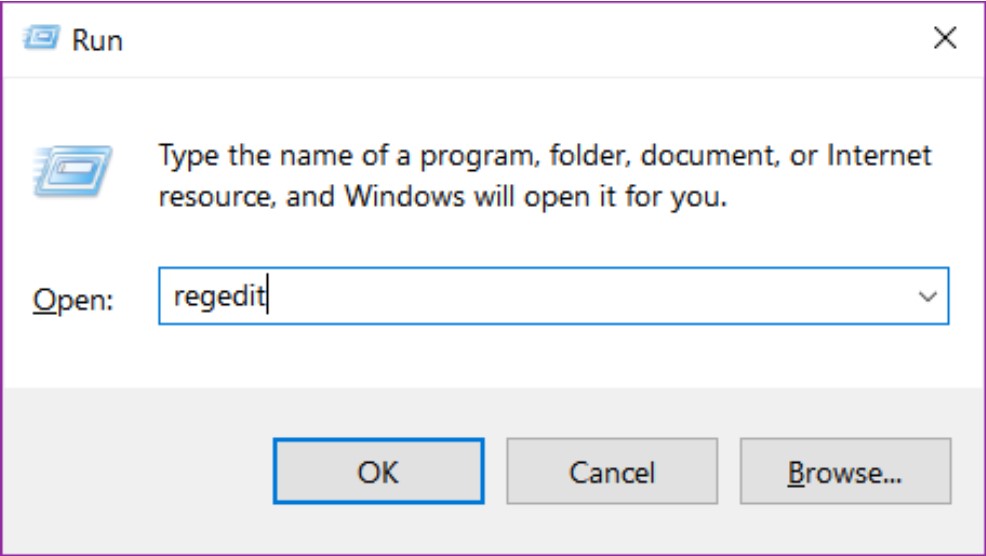
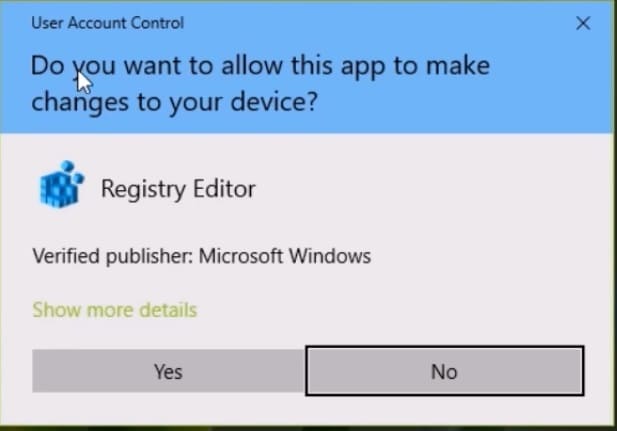
If you received an error code 39 or the driver did not install properly continue to the next step. Step 2: Open Device Manager and again navigate to the USB Serial Bus Controllers and expand. Right click on the first device listed under the USB Controllers and select Uninstall device. Repeat the device uninstall for each of the USB devices listed. Step 3: Right click on the root USB Serial Bus Controller and select Scan for hardware changes. If there is an error message or testing the USB ports you find it is still not working proceed to Method 3. METHOD 3: This section involves modifying the Windows Registry. If you are uncomfortable with modifying the registry contact a professional. Step 1: Open the Windows registry editor by pressing the Windows Key + R to launch the Run dialogue box.
Type in regedit and click OK. In the warning dialog box click Yes to allow access.
Step 2: In the registry editor navigate to the following location: Step 3: Right click the Registry Key 4D36E965-E325-11CE-BFC1-08002BE10318 and select Export. In the Export dialog box name the file and save the file. By default the file will save to the Documents folder. Step 4: Once the registry key is saved remove the value from LowerFilter and UpperFilter if the string exists. To remove the value by double clicking on the string name and in the dialog box delete contents in the Value data or Right click on the LowerFilter/UpperFilter string value and choose delete.
Step 5: Close the registry editor and repeat Method 1. METHOD 4: Follow the steps to run the System File Checker in Windows 10. After completing the article return to this article and repeat beginning with Method 1.
|
| MORE INFORMATION: If after completing all the steps above if you still are having problems with our USB ports it may be hardware related and should be taken to a computer repair professional. |
| PROPERTIES: Last modified: 7/14/19 Revision: 1.0 |
| Keywords: USB not working |
NOTICE: If you found this article of value, please help us help underprivileged individuals to have hardware and software support at reasonable prices by donating below.
Mobile Mobile was started with the underprivileged in mind. People such as retired or elderly, young adults, single parents, and others are taken advantage of every day when trying to navigate and get help this world of technology. At Mobile Mobile we take the time to fix and also teach individuals one on one with phone and computer challenges that people face daily.
iPAD: Touch Screen Not Working After Digitizer Replacement
| APPLIES TO: iPad 2, iPad 3, iPad 4 |
| SYMPTOMS: After replacing the digitizer on an iPad the touch screen does not respond. The iPad turns on and the display works, home button works, as well as power and volume buttons. |
|
RESOLUTION: iPad 2, iPad 3, and iPad 4 all use a Zif connector to connect the digitizer to the motherboard. On the ribbon cable of the digitizer, there is a white stripe, usually, that stripe indicates how far to push the ribbon cable into the connector having the white line exactly line up with the front edge of the connector. However, in this case the white line needs to be inside the connector. Seat the ribbon cable into the connector as far as it can go and test the device. If this still does not work try the following.
If you are still experiencing a problem with the touch screen it is beyond the scope of this article.
|
| MORE INFORMATION: Suggested investigation: iOS issues, digitizer may be bad or the motherboard is damaged. |
| PROPERTIES: Last modified: 6/13/20 Revision: 1.0 |
| Keywords: iPad 2, iPad 3, iPad 4, Touch screen not working, digitizer replacement |
NOTICE: If you found this article of value, please help us help underprivileged individuals to have hardware and software support at reasonable prices by donating below.
Mobile Mobile was started with the underprivileged in mind. People such as retired or elderly, young adults, single parents, and others are taken advantage of every day when trying to navigate and get help this world of technology. At Mobile Mobile we take the time to fix and also teach individuals one on one with phone and computer challenges that people face daily.
MAC: Troubleshooting Macbook Pro Hard Drive
| APPLIES TO: Macbook Pro |
| SYMPTOMS: When booting Macbook Pro a flashing Yellow Folder appears with a question mark on it. |
|
RESOLUTION: The flashing yellow folder is an indicator that the hard drive has failed, the hard drive connector has failed, or the system files needed to start-up and boot are corrupt. STEP 1:
STEP 2 SAFE BOOT:
STEP 3 RESET PRAM/NVRAM:
STEP 4 TEST HARD DRIVE USING AN EXTERNAL DRIVE CABLE
STEP 5 REMOVE THIRD PARTY RAM
STEP 6 TRY TO ACCESS THE HARD DRIVE FROM ANOTHER MAC
If you still continue to have problems contact the Genius Bar or a reputable computer repair professional. |
| MORE INFORMATION: |
| PROPERTIES: Last modified: 6/13/20 Revision: 1.0 |
| Keywords: Macbook hard drive failure, flashing yellow folder, mac won't boot |
NOTICE: If you found this article of value, please help us help underprivileged individuals to have hardware and software support at reasonable prices by donating below.
Mobile Mobile was started with the underprivileged in mind. People such as retired or elderly, young adults, single parents, and others are taken advantage of every day when trying to navigate and get help this world of technology. At Mobile Mobile we take the time to fix and also teach individuals one on one with phone and computer challenges that people face daily.
WEBSITE: How To Find Your Bing Webmaster Website Verification Code
APPLIES TO: Any website that has already been verified in Bing Webmaster
SYMPTOMS: When developing SEO for a website it is important that the verification code from main web search engines be embedded in the website or website plugins.
RESOLUTION: These are the steps to locate the Bing Webmaster verification code for a website.
- Log in to the Bing Webmaster website located at the following URL: https://www.bing.com/webmaster/home/mysites
- Click and select the website that you want to view the verification code
- You should be viewing the Dashboard for the website selected in step 2.
- Right click anywhere in the Dashboard and select Inspect or Inspect Elements.
- You will be viewing the source code for the website. Select the column titled "Sources".
- In the far left panel of the window select the website URL under Home/Dashboard.
- Press Ctrl+F to open the Search Bar and in the Search bar type in "var userID" without quotes and press enter.
- The results found should have a line like this
- var userId = "57F261F9EEF6EA2CBB54848485757594";
- The number following the var userId is the verification code.
Keywords: Retrieve Bing verification code
MORE INFORMATION:
PROPERTIES: Last modified: 6/13/20 Revision: 1.0
Keywords: Retrieve Bing Verification code for website
NOTICE: If you found this article of value, please help us help underprivileged individuals to have hardware and software support at reasonable prices by donating below.
Mobile Mobile was started with the underprivileged in mind. People such as retired or elderly, young adults, single parents, and others are taken advantage of every day when trying to navigate and get help this world of technology. At Mobile Mobile we take the time to fix and also teach individuals one on one with phone and computer challenges that people face daily.
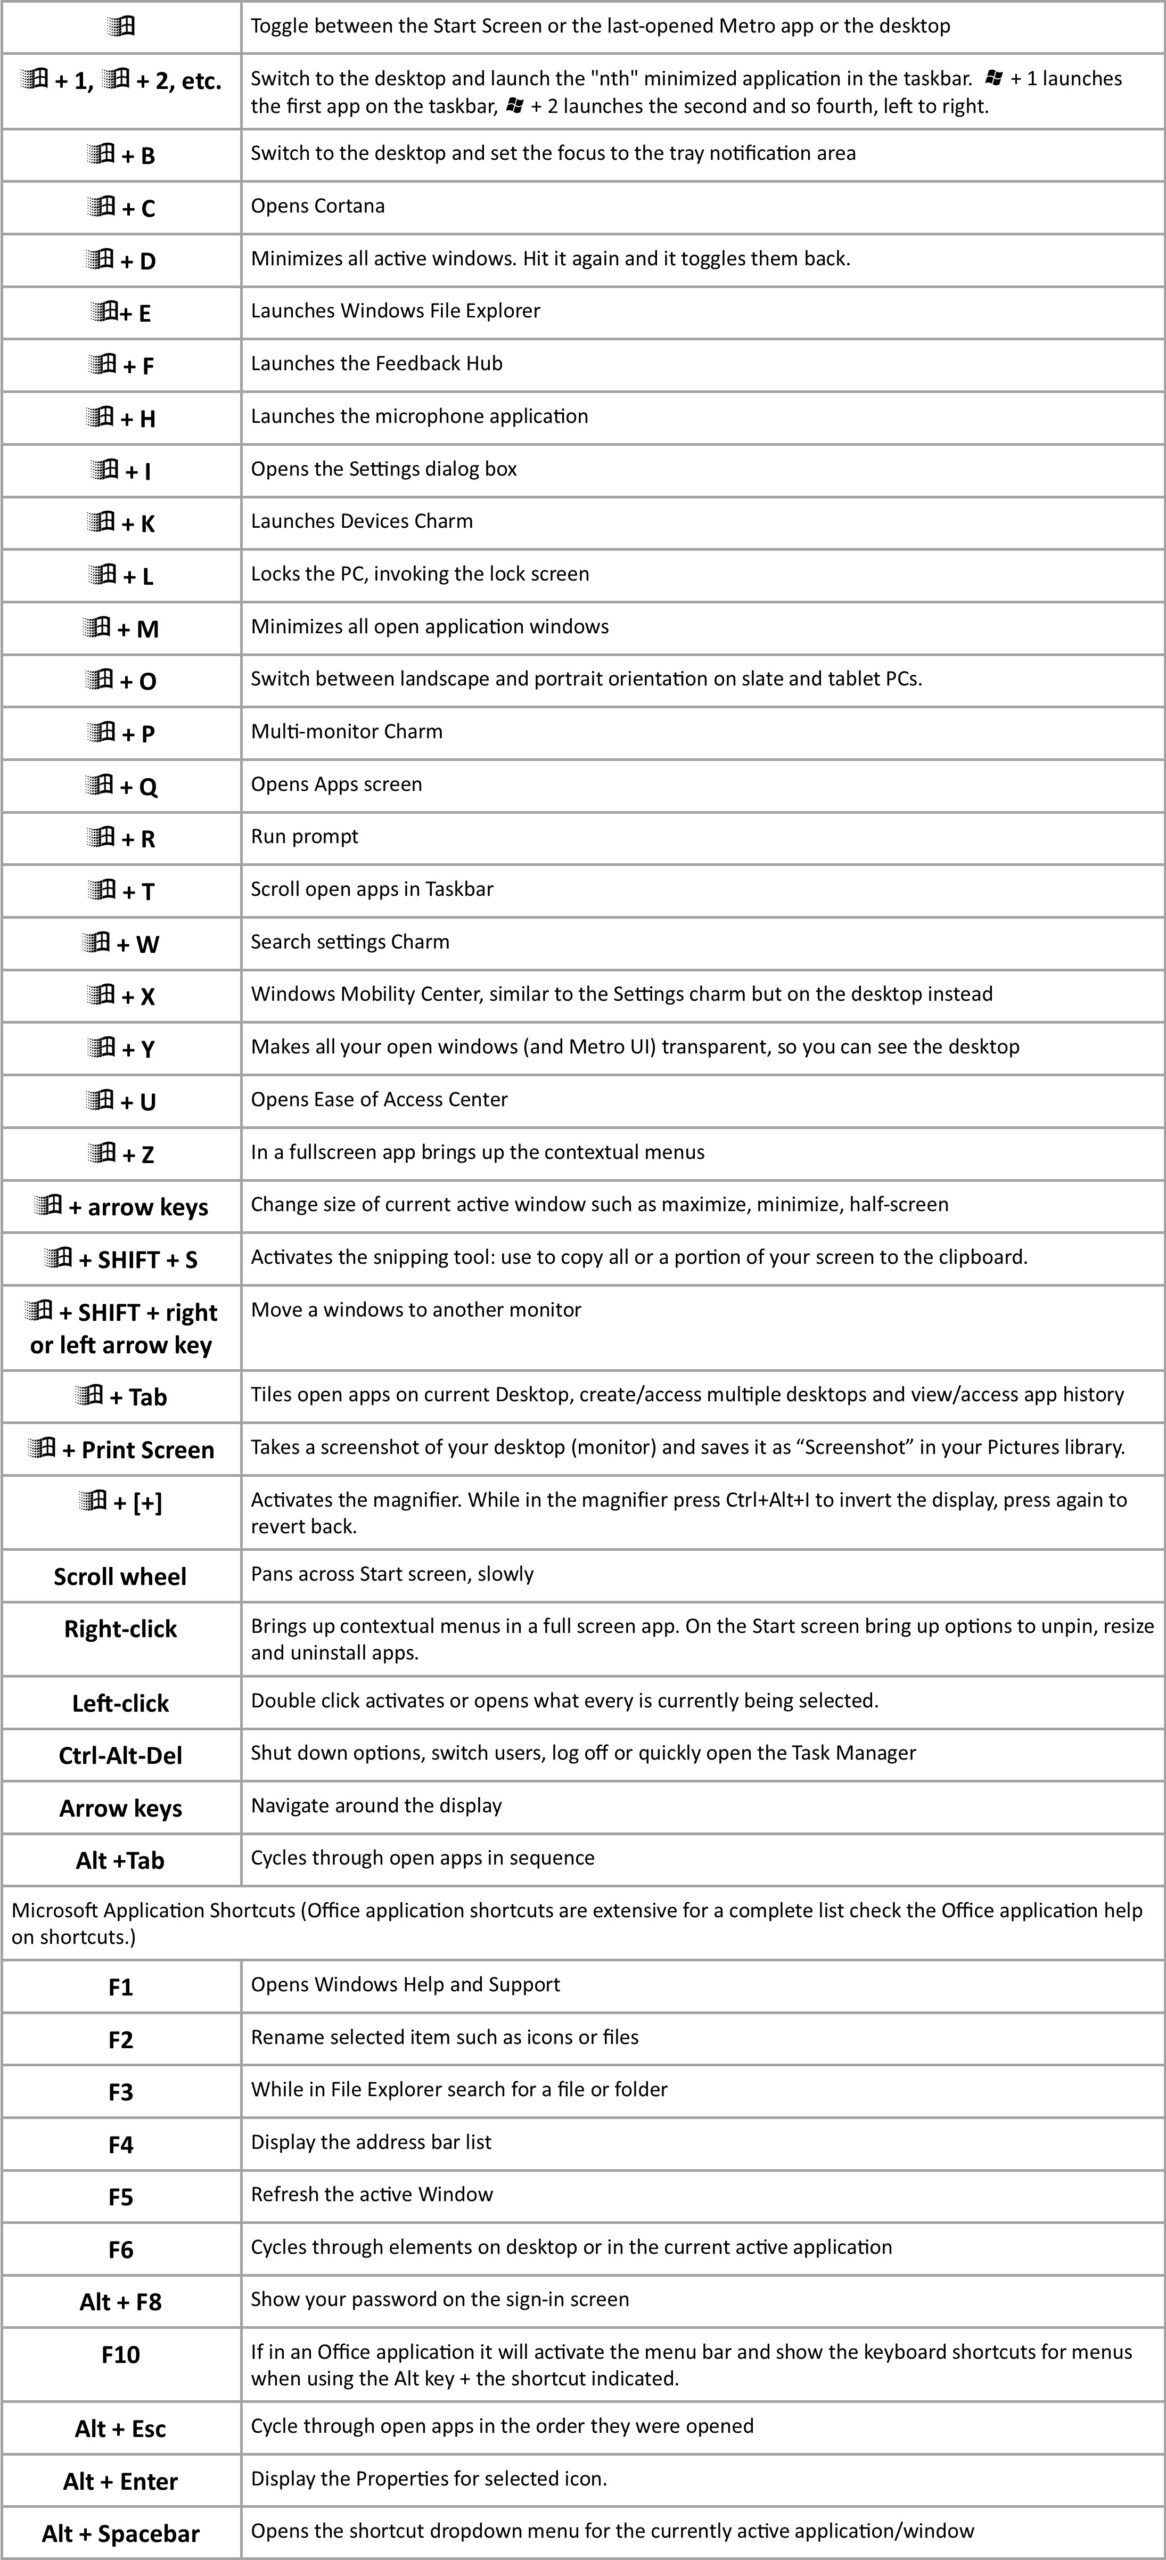
Win 10: Windows 10 Keyboard Shortcuts
| APPLIES TO: Windows, Windows 10 |
| FEATURE: As of Windows 8 launch Microsoft has increased keyboard shortcuts as an alternative to using the mouse. Many people prefer keyboard shortcuts to speed up process and avoid hand movement between the keyboard and the mouse. |
|
|
| MORE INFORMATION:
This table of shortcuts is the most commonly used. As of the release of Windows 8, the shortcuts and menu available are quite extensive. Microsoft provides this additional shortcut at the following link: |
| PROPERTIES: Last modified: 06/09/22 Revision: 1.01 |
| Keywords: Windows 10 keyboard shortcuts, keyboard shortcuts |
NOTICE: If you found this article of value, please help us help underprivileged individuals to have hardware and software support at reasonable prices by donating below.
Mobile Mobile was started with the underprivileged in mind. People such as retired or elderly, young adults, single parents, and others are taken advantage of every day when trying to navigate and get help this world of technology. At Mobile Mobile we take the time to fix and also teach individuals one on one with phone and computer challenges that people face daily.